Air Force Weather HPC11 User Guide
System Overview
The Air Force Weather (AFW) HPC11 resource is a pair of semi-redundant/autonomous machines. The two machines will be referred to as “Hall A” and “Hall B” in this document. These machines are accessed via several login nodes which provide users with a place for administrative tasks such as editing/compiling code and submitting/monitoring batch jobs. The machines are produced by Cray Computers (currently part of Hewlett Packard Enterprises) and are part of Cray/HPE’s EX series.
Compute Nodes
CPU-Only Nodes
Each hall in HPC11 contains 812 compute nodes, each of which has dual 64-core AMD EPYC processors. Each of the 64 physical cores can support two hardware threads and thus can also appear as two virtual cores. 804 of the nodes are configured with 256GB of memory while the remaining 8 are configured with 1TB.
Note
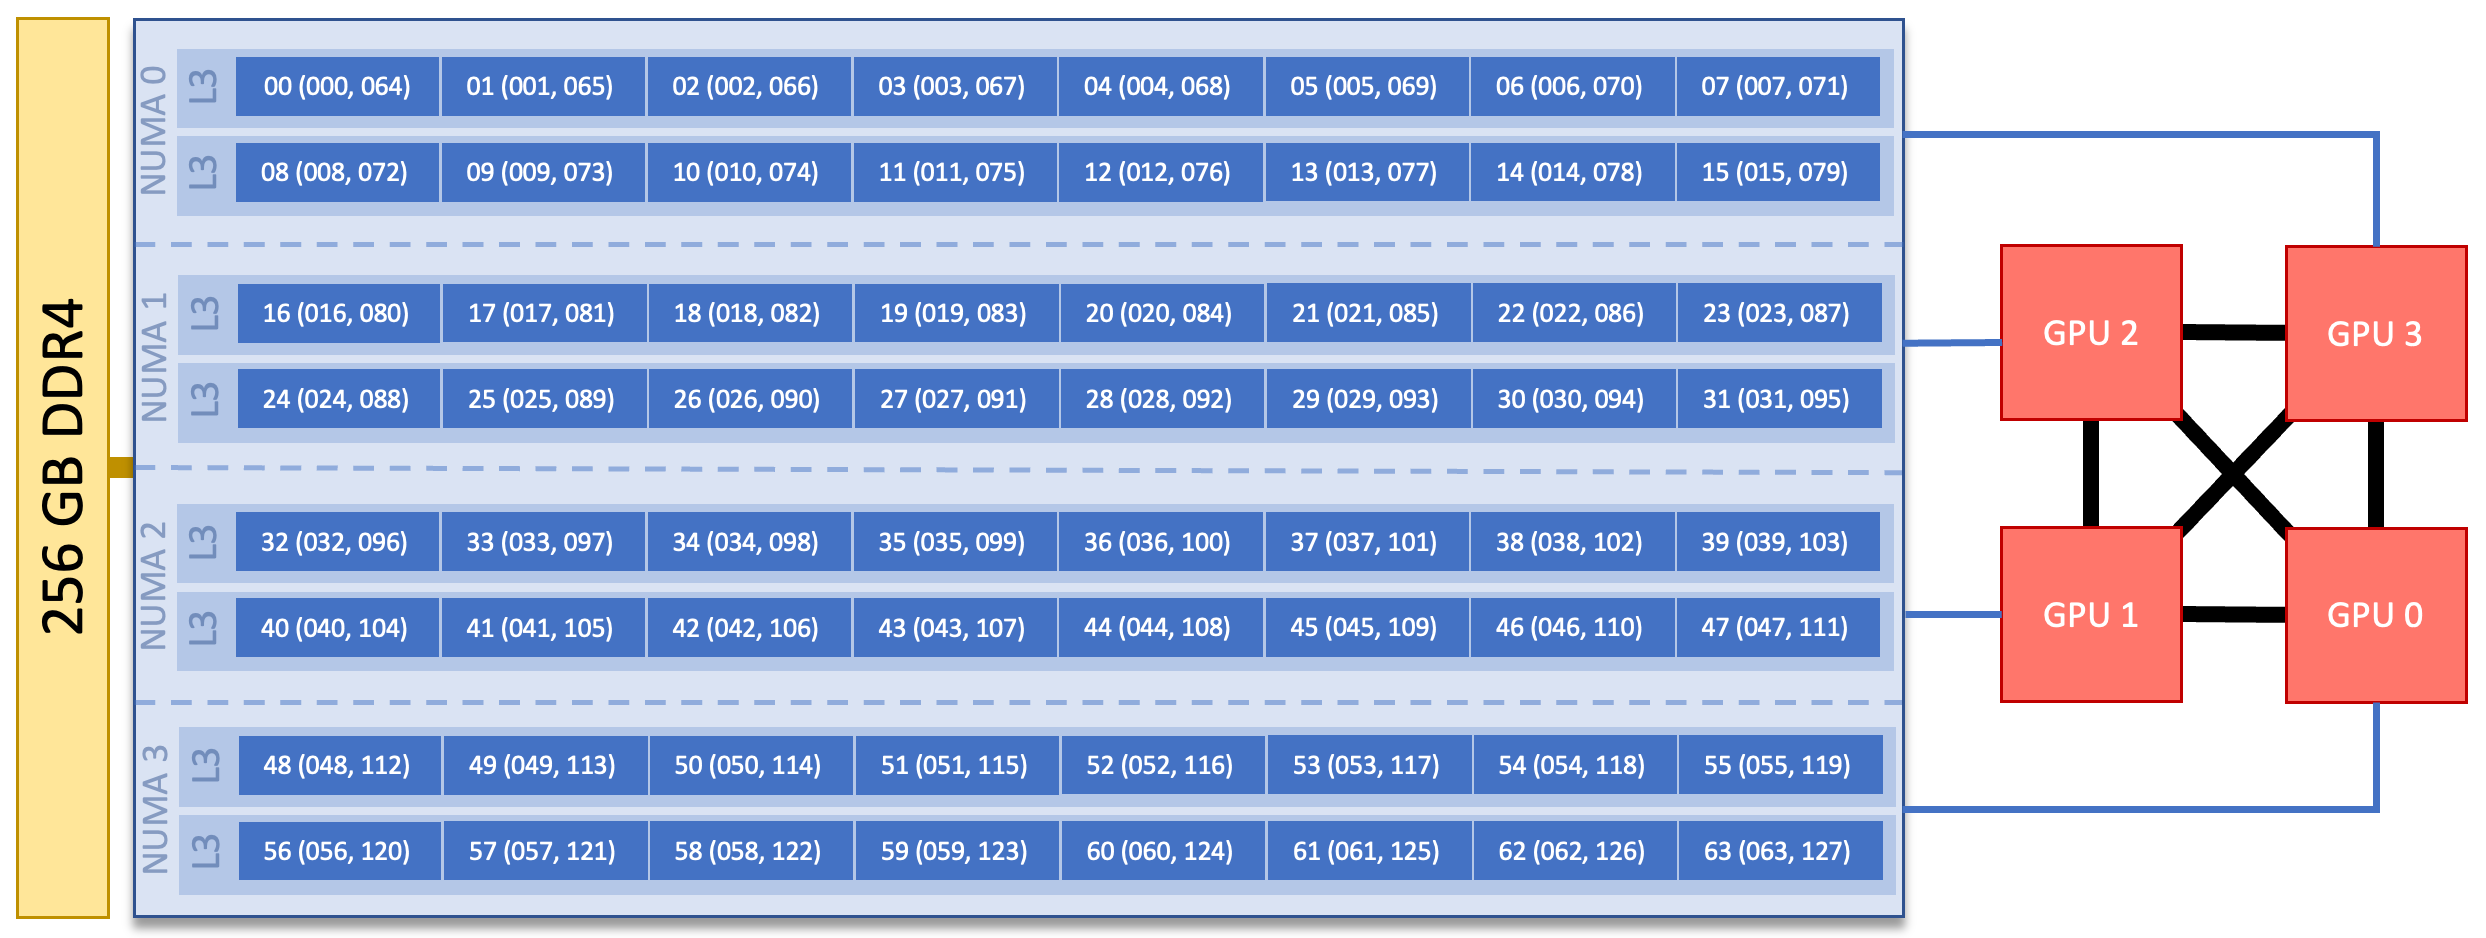
Each of the two processors on a CPU-only compute node has 4 NUMA domains, and each NUMA domain has 4 L3 cache regions. The hardware threads associated with each L3 cache & NUMA domain are shown in the node image below.

HPC11 CPU Node Diagram
CPU+GPU Nodes
Each hall also contains 32 CPU+GPU nodes. Each of these nodes contains a single 64-core AMD EPYC processor, 4 NVIDIA A100 GPUs, and 256GB of memory. On 10 of the nodes, each GPU has 40GB of HBM2 high-bandwidth memory and on the remaining 22, each GPU has 80GB of HBM2.
Note
Each CPU+GPU compute node contains a single 64-core AMD EPYC processor. Processors on CPU+GPU compute nodes are slightly different than those on the CPU-only compute nodes in that they have 4 NUMA domains with 2 L3 cache regions per NUMA domain. A GPU is associated with each NUMA domain. The hardware threads associated with each L3 cache/NUMA domain as well as the GPU associated with each NUMA doman are shown in the image below.
HPC11 CPU+GPU Node Diagram
All compute nodes mount two high-performance Lustre parallel filesystems and an NFS filesystem which provide read-only access to user home directories and shared project directories. Unless a hall is down for maintenance or some other reason, users will not see a distinction and will be able to treat HPC11 as two 800+ node computers only installed in one hall). All nodes within a hall are connected via a fast 100Gb Cray SlingShot interconnect.
Note
See the HPC11-specific documentation delivered to AFLCMC for information on submitting to the different nodes.
Login Nodes
HPC11 has multiple login nodes that are automatically rotated via round-robin DNS. The login nodes contain the same processor configuration as the compute nodes, but have 1TB of memory. These nodes are intended for tasks such as editing/compiling code and managing jobs on the compute nodes. They are a shared resource used by all HPC11 users, and as such any CPU- or memory-intensive tasks on these nodes could interrupt service to other users. As a courtesy, we ask that you refrain from doing any significant analysis or visualization tasks on the login nodes. Login nodes are accessed via ssh.
Note
For more information on connecting to the HPC11 resources, see the HPC11-specific documentation delivered to AFLCMC.
File Systems
The OLCF manages multiple filesystems for HPC11. These filesystems provide both high-performance scratch areas for running jobs as well as user and project home directory space.
There are two independent high-performance parallel Lustre scratch filesystems. Compute nodes in both halls mount both filesystems. Users may elect to store data on either filesystem (or both). Both of these filesystems are considered “scratch” in the sense that no data is automatically backed up or archived. All projects are assigned one of the two AFW lustre scratch filesystems as a default or primary fileystem but will have matching directories created in the secondary filesystem as well. Only the top-level project directories are automatically created. Users may elect to replicate directory structures and copy data between the filesystems (and are encouraged to do so), but there is no automated process to sync the two areas. The lustre filesystems are the intended as high-performance filesystems for use by running jobs.
In addition to the Lustre filesystem, each user is granted a home directory that is mounted via NFS. Similarly, projects are provided with an NFS-mounted shared project directory. These filesystems are backed up, but space in these areas is limited via quotas. Additionally, these directories are mounted read-only on compute nodes so running jobs will not be able to write data to them.
Note
For more information on the filesystems and how to use them, see the HPC11-specific documentation delivered to AFLCMC.
Shell and programming environments
HPC11 provides users with many software packages and scientific libraries installed at the system-level. These software packages are managed via Environment Modules which automaticall make the necessary changes to a user’s environment to facilitate use of the software. This sectino discusses information on using modules on HPC11.
Default Shell
A user’s default shell is selected when completing the user account request form. The chosen shell is set across all OLCF-managed resources. Currently, supported shells include:
bash
tcsh
csh
ksh
zsh
If you would like to have your default shell changed, please contact the OLCF user assistance center at afw-help@olcf.ornl.gov.
Environment Management with Modules
The HPC11 user environment is typically modified dynamically using modules (specifically, the
Environment Modules software package). These modules aim to make software usage easier by
automatically altering a user’s environment to set environment variables such as PATH and
LD_LIBRARY_PATH appropriately. Thus, users need not worry about modifying those variables
directly, they simply need to load the desired module.
The Cray Environment modules allow you to alter the software available in your shell environment with significantly less risk of creating package and version combinations that cannot coexist in a single environment.
General Usage
The interface to Lmod is provided by the module command:
Command |
Description |
|---|---|
|
Shows a terse list of the currently loaded modules. |
|
Shows a table of the currently available modules |
|
Shows help information about <modulename> |
|
Shows the environment changes made by the <modulename> modulefile |
|
Loads the given <modulename>(s) into the current environment |
|
Adds <path> to the modulefile search cache and |
|
Removes <path> from the modulefile search cache and |
|
Unloads all modules |
|
Unload then reload all currently loaded modulefiles |
|
Swap module <mod1> for <mod2> (Frequently used for changing compilers |
Cray-Specific Modules
Many of the modules on the HPC11 machine are provided by Cray. These modules will be prefixed with “cray-” in the module name. Generally, loading these modules will add their libraries, include paths, etc. to the Cray compiler wrapper environment so users do not need to add specific include or library paths to compile applications.
Installed Software
The OLCF provides some pre-installed software packages and scientific libraries within the system software environment for AF use. Additionally, the Cray programming environment includes many common libraries (e.g. netCDF, HDF5, etc). OLCF also provides an extensive Python Anaconda package with additional AFW-specific packages via the “afw-python” series of modules. AF users who find a general-purpose software package to be missing can request it through the HPC11 AFLCMC program office. AF user software applications, to include software libraries and mission-specific packages, are a user responsibility.
Compiling
Compiling on HPC11 is similar to compiling on commodity clusters, but Cray provides compiler wrappers via their Programming Environment modules that make it much easier to build codes with commonly used packages (e.g. MPI, netCDF, HDF5, etc.) by automatically including the necessary compiler/linker flags for those packages (based on the modules that are currently loaded in the user’s environment). The packages that are automatically included are typically those whose names are prefixed with “cray-” (for example, cray-netcdf).
Available Compilers
The following compiler suites are available on HPC11:
Upon login, default versions of the Cray compiler and Cray’s message passing interface (MPI) libraries are automatically added to each user’s environment.
Changing Compilers
Changing to a Different Compiler Suite
When changing to a different compiler suite (i.e. from Cray to GNU or vice versa), it’s important to make sure the correct environment is set up for the new compiler. This includes changing relevant modules for MPI and other software. To aid users in pairing the correct compiler and environment, the module system on HPC11 provides “Programming Environment” modules that pull in support and scientific libraries specific to a compiler. Thus, when changing compilers it is important to do so via the PrgEnv-[compiler] module rather than the individual module specific to the compiler. For example, to change the default environment from the Cray compiler to GCC, you would use the following command:
$ module swap PrgEnv-cray PrgEnv-gnu
This will automatically unload the current compiler and system libraries associated with it, load the new compiler environment, and load associated system libraries (e.g. MPI) as well.
Changing Versions Within a Compiler Suite
To use a specific version of a given compiler, you must first ensure the compiler’s programming environment is loaded, and then swap to the correct compiler version. For example, to change from the default Cray programming environment to the GNU environment, and then to change to a non-default version of the gcc compiler (in this example, version 9.2.0), you would use:
$ module swap PrgEnv-cray PrgEnv-gnu
$ module swap gcc gcc/9.2.0
Note
We recommend that users avoid “module purge” when using programming environment modules; rather, use the default module environment at the time of login and modify it as needed.
Compiler Wrappers
The HPC11 Programming Environment provides wrapper scripts for the compiler families and system libraries:
ccinvokes the C compilerCCinvokes the C++ compilerftninvokes the Fortran compiler
The wrapper script is independent of the back-end compiler (Cray or GNU) that is being used. Thus,
there isn’t a need to remember different names for the C/C++/Fortran compilers (which can vary from
vendor to vendor). The cc, CC, and ftn commands/wrapper scripts will always be available
and will call the appropriate vendor’s compiler. Additionally, the wrappers automatically pass the
required include and library paths to add things like MPI, netCDF, HDF5, etc., provided the
corresponding “cray-” modules (e.g. cray-netcdf) are also loaded.
Compiling MPI Codes
The compiler wrappers discussed in the previous section automatically link in MPI libraries. Thus, it is very simple to compile codes with MPI support:
C:
$ cc -o my_mpi_program.x my_mpi_program.cC++:
$ CC -o my_mpi_program.x my_mpi_program.cxxFortran:
$ ftn -o my_mpi_program.x my_mpi_program.f90
Compiling OpenMP Threaded Codes
OpenMP support is disabled by default, so you must add a flag to the compile line to enable it within your executable. The flag differs slightly between different compilers as shown below.
Programming Environment |
Language |
Flag |
Example(s) |
|---|---|---|---|
|
C |
|
|
C++ |
|
||
Fortran |
|
|
|
|
C |
|
|
C++ |
|
||
Fortran |
|
||
|
C |
|
|
C++ |
|
||
Fortran |
|
For more information on running threaded codes, please see the Thread Layout subsection of the Running Jobs section in this user guide.
Note
A special case of OpenMP is OpenMP Offloading, which is a directive-based approach to using GPUs (sometimes called “accelerators”) in your code. For information on offloading, see the section below.
Compiling GPU-Enabled Codes
There are several ways to build codes for the A100 GPUs. These include using the CUDA programming language, as well as directive based approaches like OpenMP Offloading and OpenACC. When working with GPU technology it’s common to see references to host code and device code. Host code is code that is intended to run on the CPU, while device code is code to run on the GPU (which is also sometimes generically referred to as an accelerator).
Note
The software necessary for compiling GPU-enabled codes is only available on the GPU nodes. You will need to start an interactive job targeting the GPU partition to access the modules that allow you to build GPU codes. For more information on targeting the GPU partition, see the HPC11-specific documentation provided to AFLCMC.
CUDA
CUDA is a programming language that allows you to write code that will run on GPUs by creating specific subprograms, called kernels, that contain GPU code. Several tutorials for using CUDA are available on the Oak Ridge Leadership Computing Facility’s Training Archive. A basic introduction to CUDA is available on NVIDIA’s website.
CUDA files typically have a .cu suffix. If you use this naming scheme, the system will recognize
the file as needing CUDA compilation and will automatically call the correct back-end compilers.
WIth the compiler wrappers, it is possible to have a single source file that mixes MPI code with
CUDA code, and compile it with a single command.
As noted above, you must first start an intractive job on the GPU partition. Once there, you must load needed modules to build CUDA codes:
module load cudatoolkit craype-accel-nvidia80
In general, the compiler wrappers will link in the needed CUDA libraries automatically, however, you will need to add a link flag for the NVIDIA Management Library. So, a sample CUDA compilation might be:
cc -o my_program.x my_program.cu -lnvidia-ml
You can then run this program via srun as described in that section of the documentation.
Linking CUDA-Enabled Libraries
When building with PrgEnv-nvhpc, the --cudalib flag can be used to tell the compiler to link
certain CUDA-enabled libraries. This flag accepts a comma-separated list of libraries to add to the
link line. For example, to link in CUDA-enabled BLAS and FFT libraries, you would use
--cudalib=cublas,cufft.
The Cray and GNU compilers do not support that flag, so you will need to link any needed
CUDA-enabled libraries in the usual manner (with the -l option on the compile/link line).
CUDA-Aware MPI
A special case of CUDA is CUDA-Aware MPI. With CUDA-Aware MPI, users can use device buffers directly
in MPI commands. This alleviates the need to transfer buffers between device and host before and
after the relevant MPI call. The MPI call is all that is necessary. To enable CUDA-Aware MPI, set
the environment variable MPICH_GPU_SUPPORT_ENABLED to 1 in your batch job prior to the srun
command. For ksh/bash/zsh, use export MPICH_GPU_SUPPORT_ENABLED=1; for csh/tcsh, use
setenv MPICH_GPU_SUPPORT_ENABLED 1.
OpenMP Offloading
OpenMP Offloading is a directive-based approach to using GPUs/accelerators. Rather than creating specific subroutines to use the GPUs as is the case with CUDA, with OpenMP offloading you insert directives in your code that instruct the compiler to create certain parts of your code as “device” code.
To use OpenMP Offloading, you must have the craype-accel-nvidia80 module loaded when you compile
and run. Additionally, you must provide an appropriate flag to the compiler to enable OpenMP. For
PrgEnv-gnu and PrgEnv-cray, this is the same flag described above to enable OpenMP in
general (-fopenmp or -homp). For PrgEnv-nvhpc, you must specify -mp=gpu.
Compiling Hybrid Codes
It’s common for codes to have a mix of programming models, for example MPI along with OpenMP. When compiling these codes, you can simply combine the options shown above for each programming model. For example, if you have a code that combines MPI, OpenMP threading, and CUDA, compiling with the Cray compilers could be as simple as:
cc -o my_program.x -fopenmp my_program.cu -lnvidia-ml
Running Jobs
In High Performance Computing (HPC), computational work is performed by jobs. Individual jobs produce data that lend relevant insight into grand challenges in science and engineering. As such, the timely, efficient execution of jobs is the primary concern in the operation of any HPC system.
Jobs on HPC11 typically comprises a few different components:
A batch submission script.
A binary executable.
A set of input files for the executable.
A set of output files created by the executable.
And the process for running a job, in general, is to:
Prepare executables and input files.
Write a batch script.
Submit the batch script to the batch scheduler.
Optionally monitor the job before and during execution.
The following sections describe in detail how to create, submit, and manage jobs for execution on HPC11.
Login vs Compute Nodes
As described in the System Overview, HPC11 consists of both login and compute nodes. When you
initiallly log into the HPC11 machine, you are placed on a login node. Login node resources are
shared by all users of the system. Users should be mindful of this when running tasks on the login
nodes…Login nodes should be used for basic tasks such as file editing, code compilation, data
backup, and job submission. Login nodes should not be used for memory- or compute-intensive tasks.
Users should also limit the number of simultaneous tasks performed on the login resources. For
example, a user should not run 10 simultaneous tar processes on a login node or specify a large
number to the -j parallel make option.
Note
Users should not use make -j without supplying an argument to the -j option. If -j
is specified without an argument, it make will launch an number of tasks equal to the number of
cores on the login node. This will adversely affect all users on the node.
Compute nodes are the appropriate location for large, long-running, computationally-intensive jobs. Compute nodes are requested via the Slurm batch scheduler, as described below.
Warning
Compute-intensive, memory-intensive, or otherwise disruptive processes running on login nodes may be killed without warning.
Slurm
The HPC11 resources use the Slurm batch scheduler. Previously, the HPC10 resource used the LSF scheduler. While there are similarities between different scheduling systems, the commands differ. The table below provides a comparision of useful/typical commands for each scheduler.
Task |
LSF (HPC10) |
Slurm (HPC11) |
|---|---|---|
View batch queue |
|
|
Submit batch script |
|
|
Submit interactive batch job |
|
|
Run parallel code within batch job |
|
|
Abort a queued or running job |
|
|
Node Exclusivity
The scheduler on HPC11 uses a non-exclusive node policy by default. This means that, resources permitting, the system is free to place multiple jobs per node; however, the system will not place jobs from multiple users on any node…nodes will only be shared among jobs from one user. In practice, this scheduling policy permits more efficient use of system resources by giving the scheduler the ability to “pack” several small jobs from a given user on a single node instead of requiring each to run on a separate node.
There are several caveats to non-exclusive node assignment. By default, the
system will allocate 2GB of memory per core. This can be modified with the
--mem-per-cpu flag; however, there is a maximum of 4GB/core. If you use
a --mem-per-cpu flag larger than that, the system will allocate an
additional core for each additional 4GB memory block (or fraction thereof)
that you request. For example, if you request --mem-per-cpu=10G, the
system will allocate 3 cores even if you’ve only requested 1.
Should you want exclusive node assignment, you need to specify the
--exclusive Slurm option either on your sbatch/salloc command
line or within your Slurm batch script. Additionally, you should request
--mem=0 to guarantee that the system makes all memory on each node
available to your job.
Writing Batch Scripts
Batch scripts, or job submission scripts, are the mechanism by which a user configures and submits a job for execution. A batch script is simply a shell script that also includes commands to be interpreted by the batch scheduling software (e.g. Slurm).
Batch scripts are submitted to the batch scheduler, where they are then parsed for the scheduling configuration options. The batch scheduler then places the script in the appropriate queue, where it is designated as a batch job. Once the batch jobs makes its way through the queue, the script will be executed on the primary compute node of the allocated resources.
Batch scripts are submitted for execution using the sbatch command.
For example, the following will submit the batch script named test.slurm:
sbatch test.slurm
If successfully submitted, a Slurm job ID will be returned. This ID can be used to track the job. It is also helpful in troubleshooting a failed job; make a note of the job ID for each of your jobs in case you must contact the OLCF User Assistance Center for support.
Components of a Batch Script
Batch scripts are parsed into the following three sections:
- Interpreter LineThe first line of a script can be used to specify the script’s interpreter; this line is optional. If not used, the submitter’s default shell will be used. The line uses the hash-bang syntax, i.e.,
#!/path/to/shell. - Slurm Submission OptionsThe Slurm submission options are preceded by the string
#SBATCH, making them appear as comments to a shell. Slurm will look for#SBATCHoptions in a batch script from the script’s first line through the first non-comment, non-whitespace line. (A comment line begins with#.)#SBATCHoptions entered after the first non-comment line will not be read by Slurm. - Shell CommandsThe shell commands follow the last
#SBATCHoption and represent the executable content of the batch job. If any#SBATCHlines follow executable statements, they will be treated as comments only.The execution section of a script will be interpreted by a shell and can contain multiple lines of executables, shell commands, and comments. when the job’s queue wait time is finished, commands within this section will be executed on the primary compute node of the job’s allocated resources. Under normal circumstances, the batch job will exit the queue after the last line of the script is executed.
Example Batch Scripts
Using Non-Exclusive Nodes (default)
 1#!/bin/bash
 2#SBATCH -A ABC123
 3#SBATCH -J test
 4#SBATCH -N 1
 5#SBATCH -t 1:00:00
 6#SBATCH --mem-per-core=3G
 7#SBATCH --cluster-constraint=green
 8
 9cd $SLURM_SUBMIT_DIR
10date
11srun -N1 -n 4 ./a.out
This batch script shows examples of the three sections outlined above:
Interpreter Line |
||
1 |
|
This line is optional. It is used to specify a shell to interpret the script. In this example, the Bash shell will be used. |
Slurm Options |
||
2 |
|
The job will be charged to the “ABC123” project. |
3 |
|
The job will be named test. |
4 |
|
The job will request 1 node. |
4 |
|
The job will be allocated resources to support 4 tasks per node. |
5 |
|
The job will request a walltime of 1 hour. |
6 |
|
Each core will be allocated 3GB of memory. |
7 |
|
The job will run on a cluster with the ‘green’ label |
Shell Commands |
||
8 |
This line is left blank, so it will be ignored. |
|
9 |
|
This command will change the current directory to the directory from which the script was submitted. |
10 |
|
This command will run the date command. |
11 |
|
This command will run 4 MPI instances of the executable a.out on the compute node allocated by the batch systema. |
Using Exclusive Nodes
 1#!/bin/bash
 2#SBATCH -A ABC123
 3#SBATCH -J test
 4#SBATCH -N 2
 5#SBATCH -t 1:00:00
 6#SBATCH --exclusive
 7#SBATCH --mem=0
 8#SBATCH --cluster-constraint=green
 9
10cd $SLURM_SUBMIT_DIR
11date
12srun -N2 -n 16 ./a.out
This batch script shows examples of the three sections outlined above:
Interpreter Line |
||
1 |
|
This line is optional. It is used to specify a shell to interpret the script. In this example, the Bash shell will be used. |
Slurm Options |
||
2 |
|
The job will be charged to the “ABC123” project. |
3 |
|
The job will be named test. |
4 |
|
The job will request 2 nodes. |
5 |
|
The job will request a walltime of 1 hour. |
6 |
|
The job will run in exclusive mode (no other jobs will be placed on any nodes allocated to this job) |
7 |
|
All memory on the node will be made available to the job |
8 |
|
The job will run on a cluster with the ‘green’ label |
Shell Commands |
||
9 |
This line is left blank, so it will be ignored. |
|
10 |
|
This command will change the current directory to the directory from which the script was submitted. |
11 |
|
This command will run the date command. |
12 |
|
This command will run 16 MPI instances of the executable a.out, spread out across the 2 nodes allocated by the system. By default this will be 8 tasks per node. |
Interactive Batch Jobs
Batch scripts are useful when one has a pre-determined group of commands to execute, the results of which can be viewed at a later time. However, it is often necessary to run tasks on compute resources interactively.
Users are not allowed to access compute nodes directly from a login node. Instead, users must use an
interactive batch job to allocate and gain access to compute resources. This is done by using the
Slurm salloc command. The salloc command accepts many of the same arguments that would be
provided in a batch script. For example, the following command requests an interative allocation on
a cluster with the “green” label (--cluster-constraint=green) to be charged to project ABC123
(-A ABC123), using 4 nodes (-N 4) in exclusive mode (--exclusive), with all memory on the
nodes made available to the job (--mem=0), and with a maximum walltime of 1 hour (-t 1:00:00):
$ salloc -A ABC123 -N 4 --exclusive --mem=0 -t 1:00:00 --cluster-constraint=green
While salloc does provide interactive access, it does not necessarily do so immediately. The
job must still wait for resources to become available in the same way as any other batch job. Once
resources become available, the job will start and the user will be given an interactive prompt on
the primary compute node within the set of nodes allocated to the job. Commands may then be
executed directly on the command line (rather than through a batch script). To run a parallel
application across the set of allocated comput enodes, use the srun command just as you would in
a batch script.
Debugging
A common use of interactive batch is to aid in debugging efforts. Interactive access to compute resources allows the ability to run a process to the point of failure; however, unlike a batch job, the process can be restarted after brief changes are made without losing the compute resource pool; thus speeding up the debugging effort.
Choosing a Job Size
Because interactive jobs must sit in the queue until enough resources become available to allocate, it is useful to know when a job can start.
Use the sbatch --test-only command to see when a job of a specific size
could be scheduled. For example, the snapshot below shows that a 2 node job
in exclusive mode would start at 10:54.
$ sbatch --test-only --cluster-constraint-green -N2 --exclusive --mem=0 -t1:00:00 batch-script.slurm

  sbatch: Job 1375 to start at 2019-08-06T10:54:01 using 512 processors on nodes node[0100,0121] in partition batch
Note
The queue is fluid, thus the given time is an estimate made from the current queue state and load.a Future job submissions and job completions will alter the estimate.
Common Batch Options
The following table summarizes frequently-used options for sbatch and salloc. When using
salloc, options are specified on the command line. When using sbatch, options may be
specified on the command line or in the batch script file. If they’re in the batch script file, they
must be preceeded with #SBATCH as described above.
See the salloc and sbatch man pages for a complete description of each option as well as the
other options available.
Option |
Use |
Description |
|---|---|---|
|
|
Specify the account/project to which the job should be
charged. The account string, e.g. |
|
|
Number of compute nodes to allocate. Jobs will be allocated ‘whole’ (i.e. dedicated/non-shared) nodes unless running in a “shared” partition. See the HPC11-specific documentation provided to AFLCMC for more information on HPC11 partitions. |
|
|
Maximum wall-clock time. |
|
|
Allocates resources on specified partition. See the HPC11-specific documentation provided to AFLCMC for more information on the partitions available on HPC11. |
|
|
Specify a feature that a cluster must have in order to run the job. On HPC11, this will be either blue or green as described in HPC11 specific docs delivered to AFCLMC. |
|
|
Specify the name of the job’s standard output file. |
|
|
Specify the naem of the job’s standard error file. |
|
|
Sets the job name to |
|
|
Specifies the Quality of Service level for the job |
|
|
Send email to the address specified by |
|
|
Specifies email address to use for |
|
|
Run in exclusive-node mode. |
|
|
Specify the amount of memory required per node. The
default unit is MB, but the suffixes K, M, G, and T are
supported. If the value “0” is specified, the job will be
be given access to all memory on the node.
When running in exclusive-node mode, you should set this
to 0 to ensure access to all memory on the node.
When running in non-exclusive mode, you should not use
this flag but instead use
--mem-per-core. |
|
|
Specify the amount of memory to allocate per core. This is needed when running in non-exclusive mode if you need something other than the default 2GB/core. |
|
|
Send the signal <signal> to a job <seconds> seconds
before the job reaches its walltime. The signal can be by
name or by number, so both
--signal=10@3001 and
--signal=USR1@300 would send SIGUSR1 5 minutes
prior to expiration of the job’s walltime.Signaling a job can be used, for example, to force a job
to write a checkpoint just before Slurm kills the job
(note that this option only sends the signal; the user
must still make sure their job script traps the signal and
handles it in the desired manner).
When used with
sbatch, the signal can be prefixed by
“B:” (e.g. --signal=B:USR1@300) to tell Slurm to
signal only the batch shell; otherwise all processes will
be signaled. |
Note
Because the login nodes can differ from the compute nodes, using the –get-user-env option
is not recommended. Users should create the needed environment within the batch job.
Further details and other Slurm options may be found through the sbatch and salloc man pages
or in the online Slurm documentation.
HPC11 Partitions
In Slurm terminology, a partition is a set of nodes on a cluster. The default partition on HPC11 provides CPU nodes that are exclusive to one job at a time; other partitions provide CPU nodes that can be shared among multiple jobs (for jobs that do not need a whole node) and GPU-enabled nodes (these are also allocated exclusively).
Note
See the HPC11-specific documentation delivered to AFLCMC for more information on HPC11 partitions.
Targeting HPC11 Clusters
Normally, you should not need to specify a specific cluster. The scheduler will accept your job and
schedule it on the first cluster that becomes available. In cases where you need to specify a cluster,
such as during system software updates, HPC11 implements a blue/green system via the --cluster-constraint
option to sbatch/salloc.
Note
For more information on this option, see the HPC11-specific documentation delivered to AFLCMC.
Batch Environment Variables
Slurm sets multiple environment variables at submission time. The following Slurm variables are useful within batch scripts:
Variable |
Description |
|---|---|
|
The directory from which the batch job was submitted. By default, a new job
starts in your home directory. You can return to the directory from which the
job was submitted with |
|
The job’s identifier. This variable is often used to append the jobid to standard error/output filenames. |
|
The number of nodes requested. |
|
The job name supplied by the user. |
|
The list of nodes assigned to the job. |
Job States
A job will transition through several states during its lifetime. Common ones include:
State Code |
State |
Description |
|---|---|---|
CA |
Canceled |
The job was canceled (could’ve been by the user or an administrator) |
CD |
Completed |
The job completed successfully (exit code 0) |
CG |
Completing |
The job is in the process of completing (some processes may still be running) |
PD |
Pending |
The job is waiting for resources to be allocated |
R |
Running |
The job is currently running |
Job Reason Codes
In addition to state codes, jobs that are pending will have a “reason code” to explain why the job is pending. Completed jobs will have a reason describing how the job ended. Some codes you might see include:
Reason |
Meaning |
|---|---|
Dependency |
Job has dependencies that have not been met |
JobHeldUser |
Job is held at user’s request |
JobHeldAdmin |
Job is held at system administrator’s request |
Priority |
Other jobs with higher priority exist for the partition/reservation |
Reservation |
The job is waiting for its reservation to become available |
AssocMaxJobsLimit |
The job is being held because the user/project has hit the limit on running jobs |
ReqNodeNotAvail |
The requested a particular node, but it’s currently unavailable (it’s in use, reserved, down, draining, etc.) |
JobLaunchFailure |
Job failed to launch (could due to system problems, invalid program name, etc.) |
NonZeroExitCode |
The job exited with some code other than 0 |
Many other states and job reason codes exist. For a more complete description, see the squeue man page (either on the system or online).
Monitoring and Modifying Batch Jobs
The batch scheduler provides a number of utility commands for monitoring the queue and modifying your batch jobs. Some of the more useful commands are summarized below. Most of these commands accept a wide range of options. In particular, by default most of these commands only show a small subset of data (often in columns that can be truncated) but they allow you to specify an output format in which you can choose which fields you see (and can specify a different width for those fields so nothing gets truncated). For a complete overview of each command check that command’s manpage on the system or consult Slurm’s online documentation.
Canceling/Signaling Jobs
In addition to the --signal option for the sbatch/salloc commands described
above, the scancel command can be used to manually signal a job.
Typically, scancel is used to remove a job from the queue. In this use case, you do not need to
specify a signal and can simply provide the jobid. For example, scancel 12345; however, it also
gives you the ability to send other signals to the job with the -s option. For example, if you
want to send SIGUSR1 to a job, you would use scancel -s USR1 12345.
|
Cancel job 1234/Remove the job from the queue. Note that this can be used to cancel a job in any state. |
|
Send the signal SIGUSR1 to job 1234. |
Holding/Releasing Jobs
Jobs in a non-running state may be placed on hold to prevent them from starting. This will not
remove a job from the queue, but it will not be eligible for execution until it is subsequently
released. This is helpful for cases where you do not want to remove a job, but you do not want it to
run yet (for example, you notice after you’ve submitted that some needed files are missing so you
want the job held until those files are in place). Once you’re ready to release the hold and
therefore allow the scheduler to run it, use scontrol release.
|
Place job 1234 on hold. |
scontrol release 1234 |
Remove the hold on job 1234 (let the system know it’s OK to run this job). |
Updating Job Parameters
If you submit a job and realize you requested an incorrect parameter such as walltime or number of
nodes, you can change that with scontrol update.
|
Change job 1234’s node request to 250 nodes. |
|
Change job 1234’s walltime request to 2 hours. |
Viewing Detailed Job Information
To view detailed information about a particular job (start time, node count, node list,
stdout/stderr file location, etc.) use scontrol show job. For example, scontrol show job 1234.
Viewing the Batch Queue
The squeue command can be used to view the batch queue. The command takes several options which
allow you to control how much information you see. Several examples are:
|
Show all jobs in the queue using the default output format. |
|
Show all jobs in the queue with more detailed output. |
squeue -l -u $USER |
Show all of your jobs in the queue. |
Viewing Job Accounting Information
The Slurm sacct command is used to show information from the Slurm job accounting logs and/or
the Slurm database about jobs and job steps. It shows information about jobs currently in the queue
but it also shows information about previously completed jobs. By default, it shows information from
the current day (i.e. since midnight), but there are command line options to allow you to request a
different time period.
|
Show information for all jobs (from all users). |
|
Show information for all jobs (including individual job steps) for userA. |
|
Show all job steps associated with job 1234. |
|
Show all of your jobs that completed between Dec 1-7, 2022. NOTE: If you do not specify a time with a date, it will default to 00:00:00. |
Job Execution
Once resources have been allocated through the batch system, users have the option of running commands on the allocated resources’ primary compute node (a serial job) and/or running an MPI/OpenMP executable across all the resources in the allocated resource pool simultaneously (a parallel job).
Serial Job Execution
The executable portion of batch scripts is interpreted by the shell specified on the first line of the script. If a shell is not specified, the submitting user’s default shell will be used. The serial portion of the batch script may contain comments, shell commands, executable scripts, and compiled executables. These can be used in combination to, for example, navigate file systems, set up job execution, run serial executables, and even submit other batch jobs.
Parallel Job Execution
While every batch job will include serial operations such as shell commands, most computation on HPC11 is accomplished in parallel jobs running across the set of nodes allocated to a user’s batch job. There is considerable flexibility in how parallel jobs are distributed across allocated nodes. An overview of several common options is below.
HPC11 Compute Node Layout
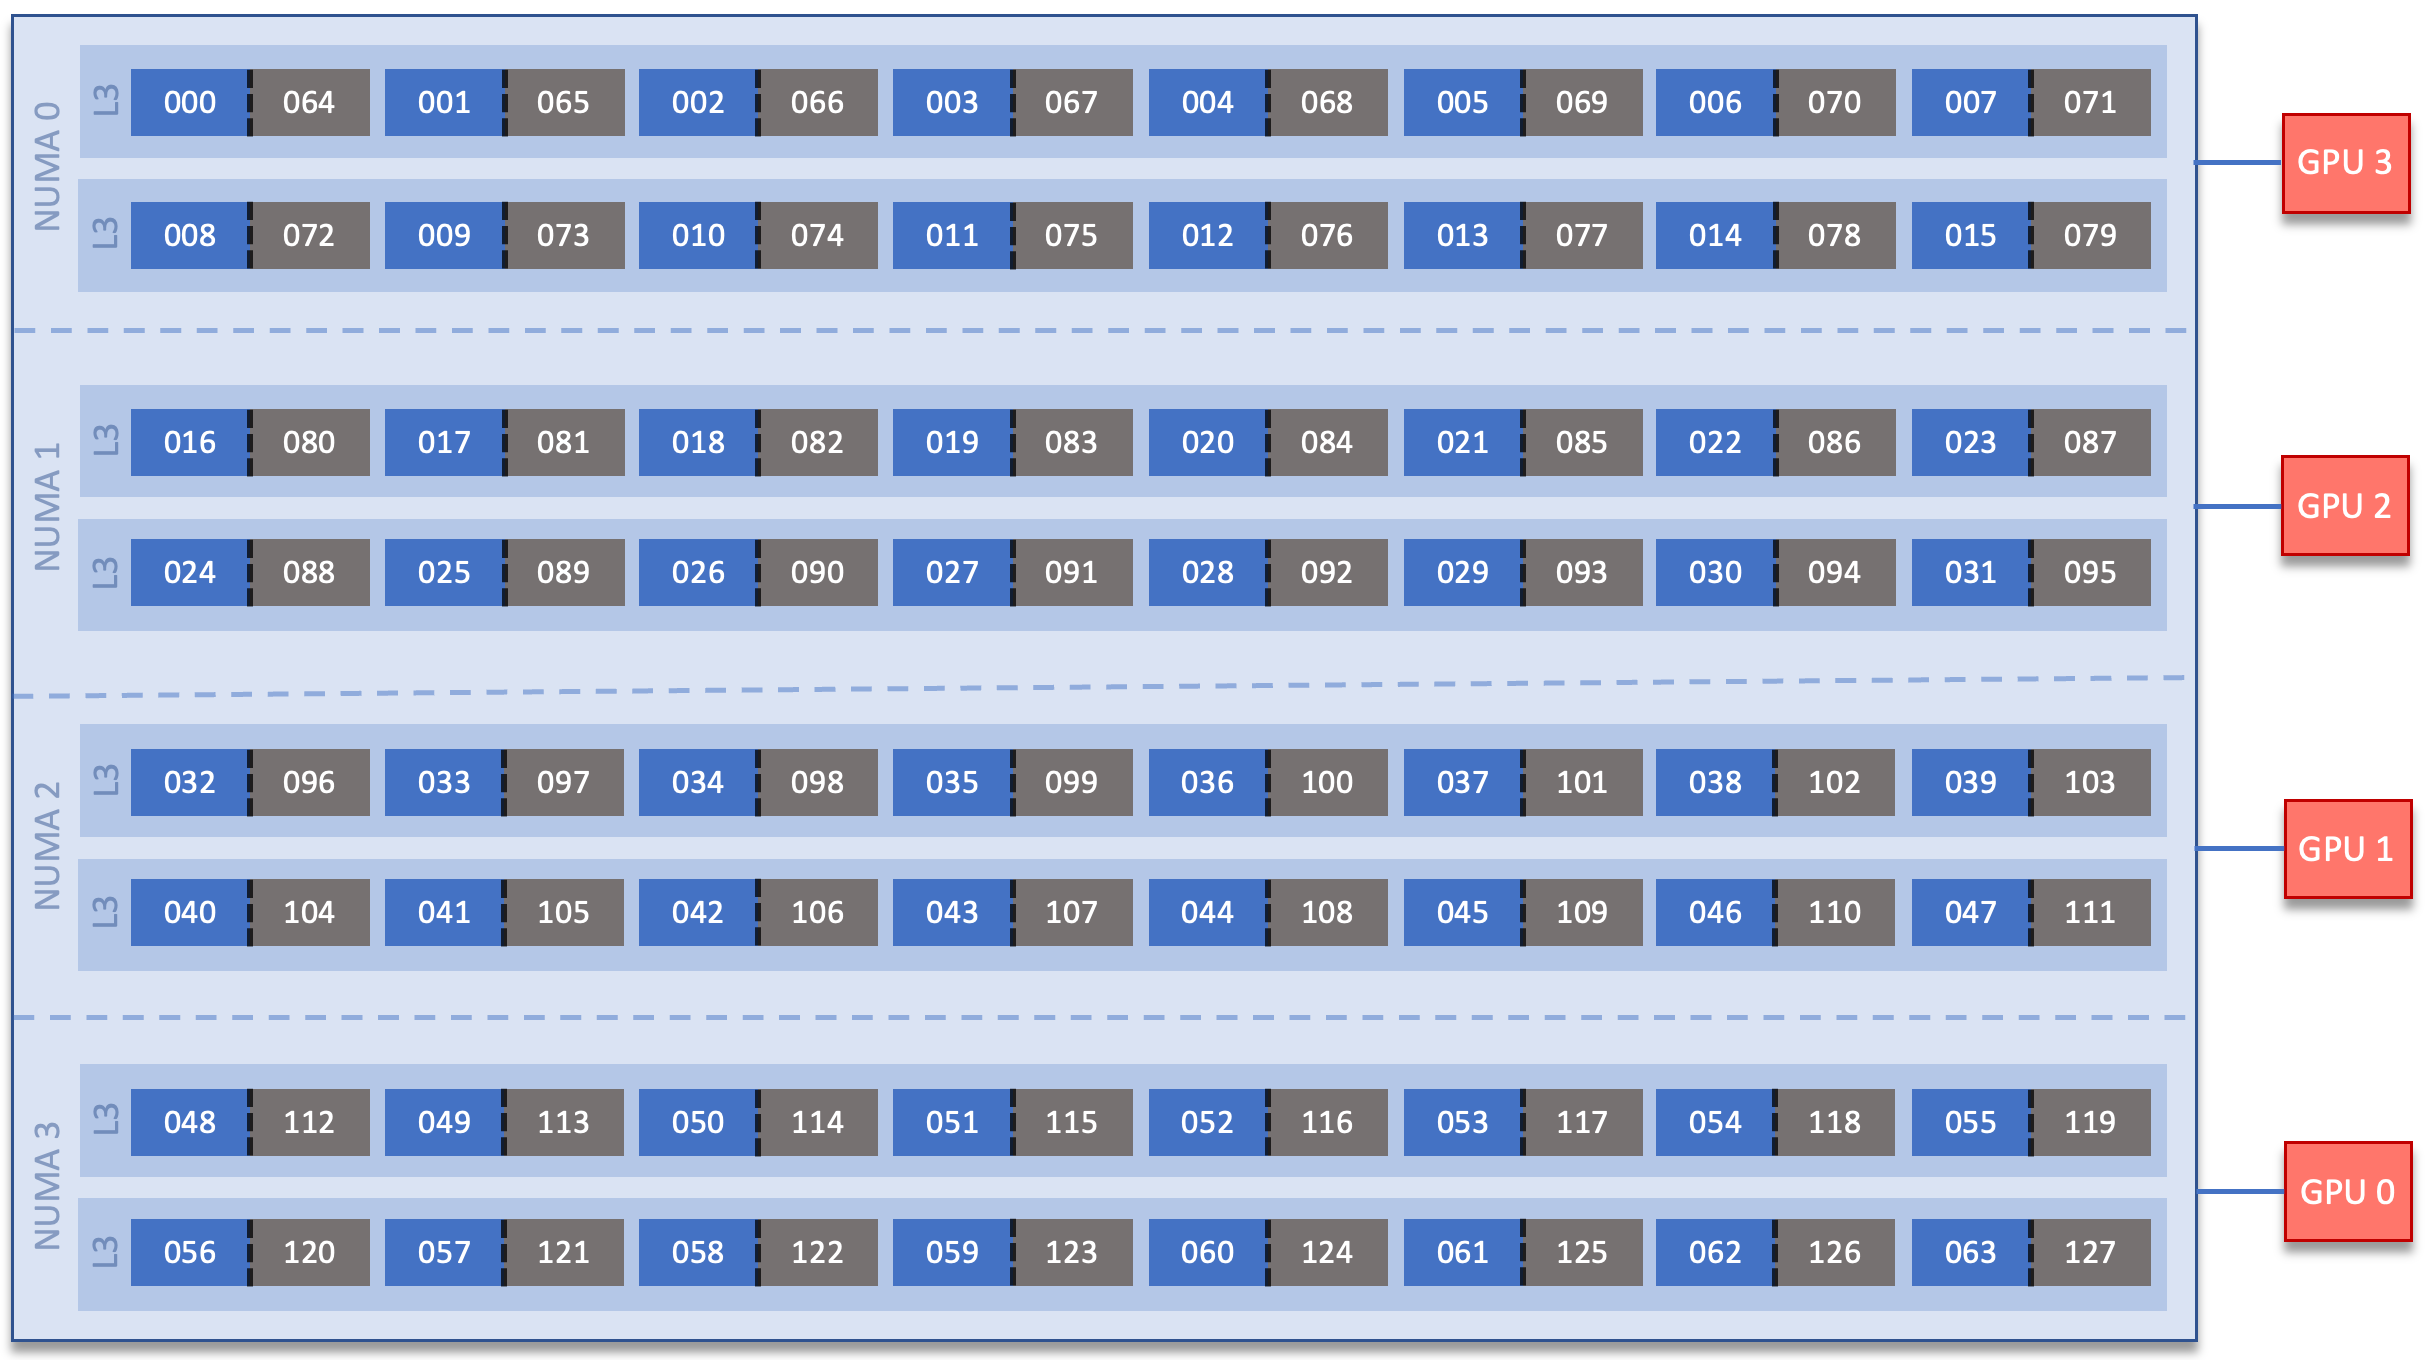
When considering how to place a job on a set of compute nodes, it is important to understand the configuration of those nodes. Recall that standard HPC11 nodes contain two 64-core processors, for a total of 128 physical cores. Each of these cores contains two hardware threads, meaning it is possible to treat each physical core as two logical cores (giving a total of 256 logical cores per node). Also, recall that one hall has 20 additional CPU+GPU nodes. These CPU+GPU nodes only contain one 64-core processor; an example CPU+GPU node is shown below the CPU-only node image.
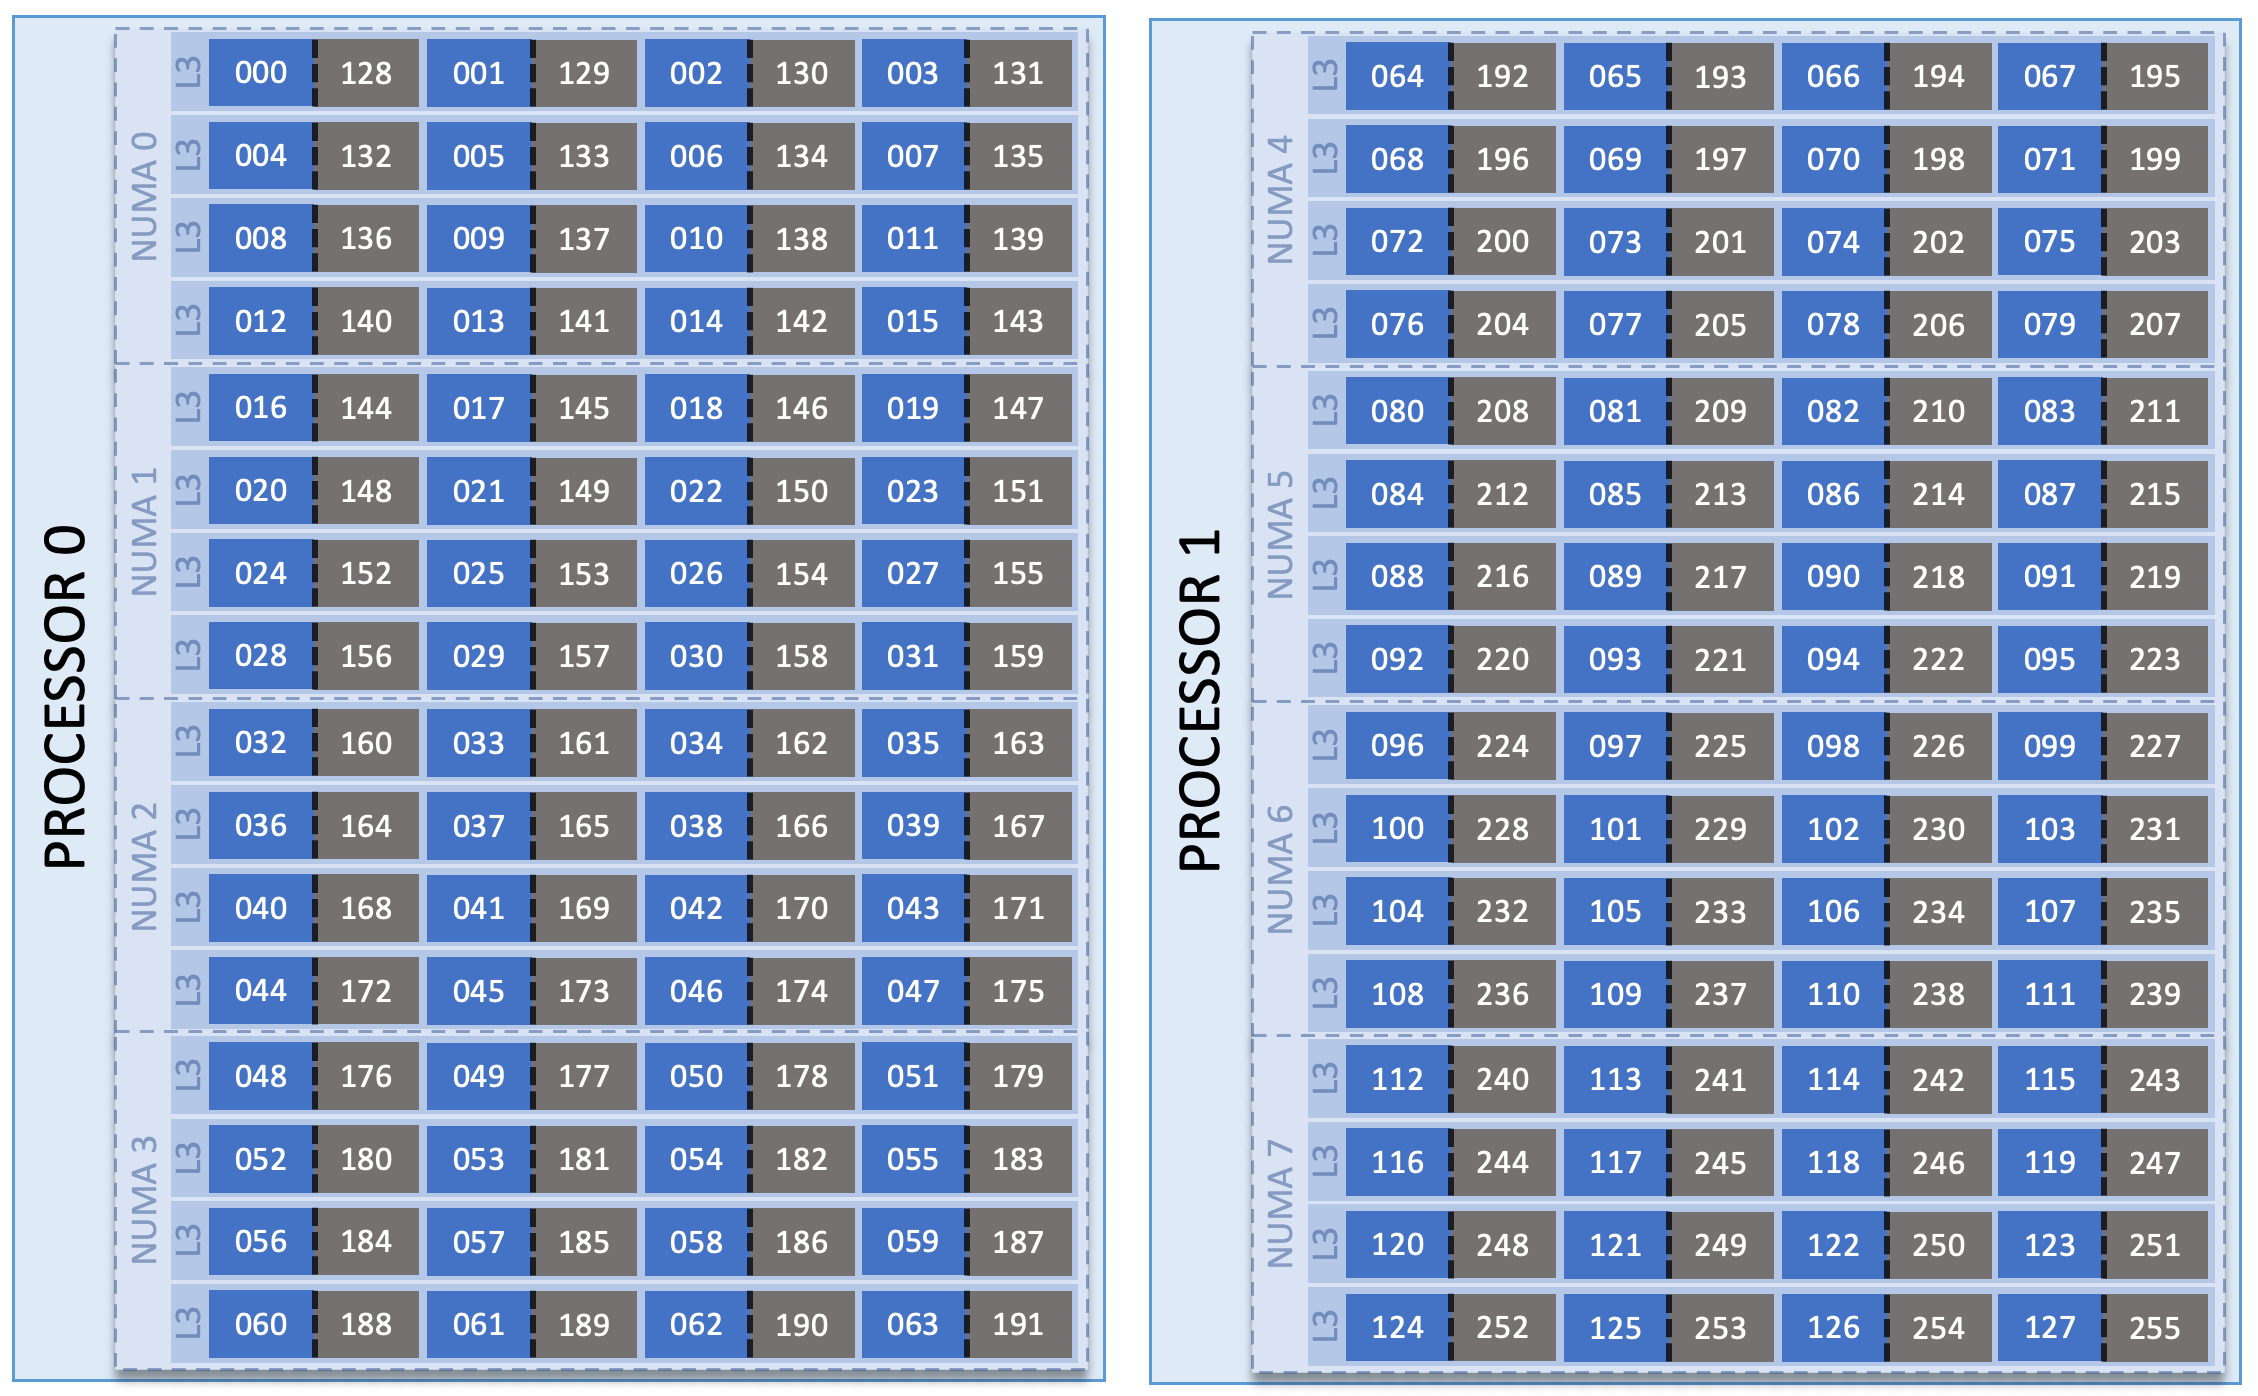
Simplified CPU-only node
Note
The AMD cores are numbered in a round-robin fashion. Cores 0-63 are on the first processor (socket 0) and cores 64-127 are on the second processor (socket 1). When we consider hyperthreading, we then see 128 additional cores: cores 128-191 on socket 0 (corresponding to physical cores 0-63) and cores 192-255 on socket 1 (corresponding to physical cores 64-127).
The CPU+GPU nodes have a slightly different configuration, with a single 64-core processor (thus, 128 logical/virtual cores) and 4 GPUs.
Simplified CPU+GPU Node
Note
As with the core numbering on the CPU-only nodes, the physical cores are numbered first (0-63); the additional cores provided through the additional hardware thread are then numbered 64-127 and correspond to the 64 physical cores.
Using srun
By default, commands will be executed on the job’s primary compute node, sometimes referred to as
the job’s head node. The srun command is used to execute an MPI binary on one or more compute
nodes in parallel.
srun accepts the following common options:
|
Minimum number of nodes |
|
Total number of MPI tasks |
|
Cores per MPI task |
|
Maximum number of tasks to be invoked on each core |
|
Allow code to control thread affinity |
|
Bind to cores |
|
Bind to hyperthreads/virtual cores |
|
Specifies the maximum number of hardware threads per physical core. “Threads” in this context means hardware threads/logical cores, NOT lightweight processes such as OpenMP threads. |
|
Total number of GPUs (across all nodes) |
|
Specify the number of GPUs per node |
|
Bind each task to the GPU on the same NUMA node as the task |
|
Bind each task to the GPU on the same NUMA node as the task |
Note
If you do not specify the number of MPI tasks to srun
via -n, the system will default to using only one task per node.
MPI Task Layout
Each compute node on HPC11 contains two sockets each with 64 cores. Each physical core can further be viewed as 2 logical cores by using hyperthreading. Depending on your job, it may be useful to control task layout within and across nodes.
Physical Core Binding
The --cpu-bind=cores flag can be used to bind MPI tasks to physical CPU cores. Note that in the
output below, the program reports two numbers for each core. These correspond to the two virtual
cores that are part of the single physical core to which the task is bound.
srun -n4 -N2 --cpu-bind=cores ./hello_affinity_hpc11.x
Rank:  0   Thread:  0   Node: node0000   Core: 0,128
Rank:  1   Thread:  0   Node: node0000   Core: 64,192
Rank:  2   Thread:  0   Node: node0001   Core: 0,128
Rank:  3   Thread:  0   Node: node0001   Core: 64,192
The -n4 specifies the total of four tasks, while -N2 specifies that we should use two nodes.
Finally, cpu-bind=cores specifies that we want to bind tasks to physical cores.
Hardware Thread/Virtual Core Binding
The --cpu-bind=threads flag is used to bind MPI tasks to hardware threads/virtual cores. Recall
that each physical core has two virtual cores. Unlike the example above, each task shows only one
number for core because in this mode, the system views each hardware thread/virtual core as a
separate core.
srun -n8 -N2 --cpu-bind=threads ./hello_affinity_hpc11.x
Rank:  0   Thread:  0   Node: node0000   Core: 0
Rank:  1   Thread:  0   Node: node0000   Core: 64
Rank:  2   Thread:  0   Node: node0000   Core: 128
Rank:  3   Thread:  0   Node: node0000   Core: 192
Rank:  4   Thread:  0   Node: node0001   Core: 0
Rank:  5   Thread:  0   Node: node0001   Core: 64
Rank:  6   Thread:  0   Node: node0001   Core: 128
Rank:  7   Thread:  0   Node: node0001   Core: 192
Specifying Task Distribution
The -m flag is used to specify task distribution. It accepts one to three colon-separated
arguments. The first specifies distribution between nodes in your allocation, the second specifies
distribution between sockets in each node, and the third specifies distribution between cores within
a CPU. The second and third arguments are optional.
Several distribution methods are permitted but two common ones are block which places
consecutive tasks on the same resource and cyclic which places tasks on adjacent resources in a
round-robin fashion. Note that block will not necessarily fill a resource before moving to the
next one, because srun will also honor your -N request. Thus, in the example below a block
distribution of 16 tasks across two nodes, 8 are placed on each node (because of the -N option)
even though they could easily fit on a single node.
srun -N2 -n8 --cpu-bind=threads --ntasks-per-core=1 -m block:block ./hello_affinity_hpc11.x
Rank:  0   Thread:  0   Node: node0000   Core: 0
Rank:  1   Thread:  0   Node: node0000   Core: 1
Rank:  2   Thread:  0   Node: node0000   Core: 2
Rank:  3   Thread:  0   Node: node0000   Core: 3
Rank:  4   Thread:  0   Node: node0001   Core: 0
Rank:  5   Thread:  0   Node: node0001   Core: 1
Rank:  6   Thread:  0   Node: node0001   Core: 2
Rank:  7   Thread:  0   Node: node0001   Core: 3

srun -N2 -n8 --cpu-bind=threads --ntasks-per-core=1 -m block:cyclic ./hello_affinity_hpc11.x
Rank:  0   Thread:  0   Node: node0000   Core: 0
Rank:  1   Thread:  0   Node: node0000   Core: 64
Rank:  2   Thread:  0   Node: node0000   Core: 1
Rank:  3   Thread:  0   Node: node0000   Core: 65
Rank:  4   Thread:  0   Node: node0001   Core: 0
Rank:  5   Thread:  0   Node: node0001   Core: 64
Rank:  6   Thread:  0   Node: node0001   Core: 1
Rank:  7   Thread:  0   Node: node0001   Core: 65

srun -N2 -n8 --cpu-bind=threads --ntasks-per-core=1 -m cyclic:block ./hello_affinity_hpc11.x
Rank:  0   Thread:  0   Node: node0000   Core: 0
Rank:  1   Thread:  0   Node: node0001   Core: 0
Rank:  2   Thread:  0   Node: node0000   Core: 1
Rank:  3   Thread:  0   Node: node0001   Core: 1
Rank:  4   Thread:  0   Node: node0000   Core: 2
Rank:  5   Thread:  0   Node: node0001   Core: 2
Rank:  6   Thread:  0   Node: node0000   Core: 3
Rank:  7   Thread:  0   Node: node0001   Core: 3

srun -N2 -n8 --cpu-bind=threads --ntasks-per-core=1 -m cyclic:cyclic ./hello_affinity_hpc11.x
Rank:  0   Thread:  0   Node: node0000   Core: 0
Rank:  1   Thread:  0   Node: node0001   Core: 0
Rank:  2   Thread:  0   Node: node0000   Core: 64
Rank:  3   Thread:  0   Node: node0001   Core: 64
Rank:  4   Thread:  0   Node: node0000   Core: 1
Rank:  5   Thread:  0   Node: node0001   Core: 1
Rank:  6   Thread:  0   Node: node0000   Core: 65
Rank:  7   Thread:  0   Node: node0001   Core: 65
Thread Layout
When running a threaded code, you should specify the -c option to allocate enough cores for the
threads associated with each MPI task. This does not actually cause that number of threads to be
spawned; it merely reserves the space for them. You must still specify the number of threads either
programmatically or via the OMP_NUM_THREADS environment variable.
Warning
If you do not add enough resources using the -c flag, threads may be placed on the same
resource. This can lead to lower-than-expected performance due to resource contention on the
oversubscribed core.
export OMP_NUM_THREAD=4
srun -n4 -N2 -c4 --cpu-bind=threads --threads-per-core=1 ./hello_affinity_hpc11.x
Rank:  0   Thread:  0   Node: node0000   Core: 0
Rank:  0   Thread:  1   Node: node0000   Core: 1
Rank:  0   Thread:  2   Node: node0000   Core: 2
Rank:  0   Thread:  3   Node: node0000   Core: 3
Rank:  1   Thread:  0   Node: node0000   Core: 64
Rank:  1   Thread:  1   Node: node0000   Core: 65
Rank:  1   Thread:  2   Node: node0000   Core: 66
Rank:  1   Thread:  3   Node: node0000   Core: 67
Rank:  2   Thread:  0   Node: node0001   Core: 0
Rank:  2   Thread:  1   Node: node0001   Core: 1
Rank:  2   Thread:  2   Node: node0001   Core: 2
Rank:  2   Thread:  3   Node: node0001   Core: 3
Rank:  3   Thread:  0   Node: node0001   Core: 64
Rank:  3   Thread:  1   Node: node0001   Core: 65
Rank:  3   Thread:  2   Node: node0001   Core: 66
Rank:  3   Thread:  3   Node: node0001   Core: 67
Running GPU-enabled Jobs
Many of the options above also apply to GPU-enabled jobs; however, those jobs need additional options to specify how to use the GPUs provided on the job’s nodes. As with the thread options above, these options do not actually make a job use the GPUs; they merely reserve the GPUs so that they are available to your program. To run GPU-enabled jobs, you must use the GPU partition.
Note
For more information on targeting the GPU partition, see the HPC11-specific documentation provided to AFLCMC.
Multiple Simultaneous Jobsteps
Multiple simultaneous sruns can be executed within a batch job by placing each srun in the background.
 1#!/bin/bash
 2#SBATCH -N 2
 3#SBATCH -t 1:00:00
 4#SBATCH -A NWPxxx
 5#SBATCH -J simultaneous-jobsteps
 6#SBATCH --mem-per-core=2G
 7
 8srun -n16 -N2 -c1 --cpu-bind=cores --exclusive ./a.out &
 9srun -n8 -N2 -c1 --cpu-bind=cores --exclusive ./b.out &
10srun -n4 -N1 -c1 --cpu-bind=threads --exclusive ./c.out &
11srun -n4 -N1 -c1 --cpu-bind=threads --exclusive ./c.out &
12wait
Note
The wait command must be used in a batch script to prevent the shell from exiting before all
backgrounded sruns have completed.
Warning
The --exclusive srun flag must be used to prevent resource sharing. Without the flag, each
backgrounded srun will likely be placed on the same resources.
Batch Queues on HPC11
Note
The queues and queue policies for the HPC11 machine can be found in the HPC11-specific documentation delivered to AFLCMC.
Job Accounting on HPC11
Jobs on HPC11 are scheduled in full node increments; a node’s cores cannot be allocated to multiple jobs. Because the projects are charged based on what a job makes unavailable to other users, a job is charged for an entire node even if it uses only one core on a node.
Node-Hour Calculation
The node-hour charge for each batch job will be calculated as follows:
node-hours = nodes requested * ( batch job endtime - batch job starttime )
Where batch job starttime is the time the job moves into a running state, and batch job endtime is the time the job exits a running state.
A batch job’s usage is calculated solely on requested nodes and the batch job’s start and end time. The number of cores actually used within any particular node within the batch job is not used in the calculation. For example, if a job requests (6) nodes through the batch script, runs for (1) hour, uses only (2) CPU cores per node, the job will still be charged for 6 nodes * 1 hour = 6 node-hours.
Viewing Usage
Utilization is calculated daily using batch jobs which complete between 00:00 and 23:59 of the previous day. For example, if a job moves into a run state on Tuesday and completes Wednesday, the job’s utilization will be recorded Thursday. Only batch jobs which write an end record are used to calculate utilization. Batch jobs which do not write end records due to system failure or other reasons are not used when calculating utilization. Jobs which fail because of run-time errors (e.g. the user’s application causes a segmentation fault) are counted against the allocation.
Each user may view usage for projects on which they are members from the myOLCF User Portal. Through myOLCF, users can view
YTD usage by system, subproject, and project member
Monthly usage by system, subproject, and project member
YTD usage by job size groupings for each system, subproject, and project member
Weekly usage by job size groupings for each system, and subproject
Batch system priorities by project and subproject
Project members
Additionally, users can apply for membership in other projects via myOLCF.
myOLCF is provided to aid in the utilization and management of OLCF allocations. If you have any questions or have a request for additional data, please contact the OLCF User Assistance Center.